RESTORATION FILE OF HARRY THE HA VAN

This is an area for discussion about Restoration issues.

RESTORATION FILE OF HARRY THE HA VAN

Postby marky » Sun Aug 19, 2007 8:58 am

here we go with restoration file if u would like to see the previous pic please look at my ha pics or in the garage

14\8\2007
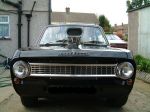
i brought a bedford ha van 1975 in glacier blue for a restoration project
Image


me and brother removed the engine due to being ceased but will be going back in once recon then it was dark

Image


i have now removed the sump for inspection on the piston which was ceased from the engine and it is not looking good will be needing reboar

Image
Image


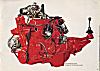
today i have had a busy day i have removed all parts from the engine leaving it has a bare block as u can see in pic below
Image

also i have removed most the parts from the head except valve springs as i could not find the tool lol
Image
Last edited by marky on Thu Nov 29, 2007 8:51 pm, edited 2 times in total.
User avatar
marky
Looking on eBay
 
Posts: 170
Joined: Sat Feb 24, 2007 5:42 am
Location: camborne cornwall

ha resto

Postby marky » Mon Aug 27, 2007 6:08 pm

Not done nothing to the van for a few days due to working but today back on it again I have stripped the engine bay out and wiring loom and heater and gave it a pressure wash and a degrease I can now see what I have got to work with

Image
Last edited by marky on Thu Nov 29, 2007 8:53 pm, edited 1 time in total.
User avatar
marky
Looking on eBay
 
Posts: 170
Joined: Sat Feb 24, 2007 5:42 am
Location: camborne cornwall

ha resto

Postby marky » Thu Nov 29, 2007 8:29 pm

right just got my block back re bored new pistons fitted plus 20 here is the pic

Image


head as now gone to be skimmed pics to follow
User avatar
marky
Looking on eBay
 
Posts: 170
Joined: Sat Feb 24, 2007 5:42 am
Location: camborne cornwall

Postby pbottomley » Thu Nov 29, 2007 10:49 pm

alll looking good Marky.... keep it up sone, at this rate I will shipping stuff to you to finish ;)
User avatar
pbottomley
 

Postby lambaj » Thu Nov 29, 2007 11:02 pm

Gosh, thats engines seen a lot of water!. I would personally bin the camshaft - to clean up the lobes will almost certainly knacker the case hardening, and the followers will also be trashed. I admire your determination to rebuild the engine- think I would have sourced an alternate engine myself.
Good luck to you
Tony (HA21)
"Ere look - thats one of them Mk2 Vauxhall Cortinas....!!"
User avatar
lambaj
Brabham Viva
Brabham Viva
 
Posts: 526
Joined: Wed Nov 09, 2005 8:53 am
Location: Rayleigh, Essex

Postby marky » Fri Nov 30, 2007 12:34 am

hi there tony no need to worry as i have a new camshaft to go in and all the other engine parts are all new that will be fitted as well
User avatar
marky
Looking on eBay
 
Posts: 170
Joined: Sat Feb 24, 2007 5:42 am
Location: camborne cornwall

ha resto

Postby marky » Sun Dec 02, 2007 10:52 pm

today i have put new shells main bearings and crankshaft and new oil seal in all been well oiled and torqued to the right settings and cor plugs removed here is some pics

Image

Image
User avatar
marky
Looking on eBay
 
Posts: 170
Joined: Sat Feb 24, 2007 5:42 am
Location: camborne cornwall

ha resto

Postby marky » Mon Dec 10, 2007 11:01 pm

ok then yesterday i undercoated my block and sump with high temp stove paint then tonight i have put the tappets and camshaft back in new timing gears and chain are on and all oiled and then i have give my block two coats of gloss black will leave to dry then put the oil pump in and shiny cor plugs and fuel pump etc here are some pics

Image

Image
User avatar
marky
Looking on eBay
 
Posts: 170
Joined: Sat Feb 24, 2007 5:42 am
Location: camborne cornwall

Postby lambaj » Tue Dec 11, 2007 8:46 am

Serious suggestions:

Wait until the short block is complete before painting anymore. You should paint the core plugs, even the insides before fitting - it helps with corrosion in the long term, but especially the outside. Don't forget a smear of hard setting sealant. Also when painting the block, the sump does not completely cover the bottom of the block, so you can easily miss bits and end up with rusty streaks from exposed iron etc.

Have you checked the whole rotating assembly is nice and free, with no binds or sticky bits ? Well worth doing. Also checking crankshaft end float - I expect it will be fine, but worth it. Also, now is the time to fit a new clutch spigot bearing. Its a complete *Bleep* when you fit the gearbox and find out you forgot (have Teeshirt)

PS, I, can't see you photos as our work firewall block photobucket, imageshack etc etc, so some of my advise might be irrelevant.......

Keep up the good work
Tony (HA21)
"Ere look - thats one of them Mk2 Vauxhall Cortinas....!!"
User avatar
lambaj
Brabham Viva
Brabham Viva
 
Posts: 526
Joined: Wed Nov 09, 2005 8:53 am
Location: Rayleigh, Essex

HA RESTO

Postby marky » Wed Dec 26, 2007 8:17 pm

Today i have removed the gearbox from the van and the front axle here are some pics

Image

Image
User avatar
marky
Looking on eBay
 
Posts: 170
Joined: Sat Feb 24, 2007 5:42 am
Location: camborne cornwall

Next

Return to Restoration

Who is online

Users browsing this forum: No registered users and 28 guests