I've just finished fitting electronic ignition to our 1256 HC. I can't claim all the credit. I couldn't have done it without plenty of advice from 1256man (Dave). I did it cheap, but it would have been easier to get a conversion kit if I could have afforded it.
Here is a set of instructions on how to do it if any wish to do the same for their car.
You will need to use an early fiesta/escort ohv dizzy and modify it to fit.
You will need a bench grinder, electronic ignition coil, dremel and attachments, angle grinder, tippex, set of verniers, bench vice, file, screwdrivers, spanners, and electrical connectors of some type (ideally a soldering iron and solder), insulation tape, connector plug off the old ford, a few washers (with a 12.5mm hole in the centre I used 10mm ones and drilled/filed them out).
Basically you take off the original drive cog after drifting out the roll pin. Then you shorten and reshape the end of the shaft to a flat blade. I used a bench grinder to do this. I made plenty of measurements of my old dizzy with a set of verniers before starting cutting. I also used an old carrier bag and the tape to cover up the rest of the dizzy to stop metal filings getting everywhere (remember this is a permanent magnet ignition system and will therefore attract iron filings to all the wrong places at the top of the dizzy).
It is PARTICULARLY IMPORTANT to make sure the flat blade is cut in the correct position in relation to the rotor arm in such a way as to allow the distributor to turn enough to adjust the timing. I marked the position of TDC on the inside and outside of the dizzy and the position of the rotor arm at TDC using tippex (it should point to the number 1 plug lead). On my particular model the dizzy had an offset drive so it will only fit one way around. I had to make sure the new flat was cut the correct way around. If you get it wrong and are 180 degrees out, just move all the plug leads around two spaces.
The new dizzy is a bit taller than the old one so the clamp has to be moved down the shaft a bit below the oil seal. This is where the dremel came into use. Using the dremel I ground a new groove for the oil seal a little way below the new position of the clamp. This took quite some time and careful use of a couple of different attachments. The trick is getting it smooth and the correct depth.
Then I fitted a few washers to the bottom of the dizzy and tapped the rollpin back in to hold the shaft in the correct position. Put the dizzy in the car and then noticed the clip for the cap fouled the casting of the engine. Back out came the dizzy and the angle grinder to grind the sticky outy bit off the cylinder head. Refitted the dizzy and then wired it in.
The wiring is important to get right. see picture with terminal info below.
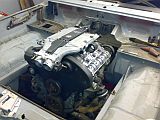
Got the engine running and fine tuned the timing.
If you've done it right you should have something like the picture below (courtesey of 1256man again. Thanks Dave!).
Undertake this at your own risk. Do it carefully and take your time. You will need a whole afternoon to do this.
Good Luck
Tom
How to fit Electronic ignition for £20
8 posts
• Page 1 of 1
How to fit Electronic ignition for £20
![]() by sportston » Sat Aug 01, 2009 9:40 pm
by sportston » Sat Aug 01, 2009 9:40 pm
- Attachments
-
- All fitted
- bosch dizzy.jpg (73.51 KiB) Viewed 5940 times
-
- Module connections
- bosch ignition module.gif (28.09 KiB) Viewed 5940 times
- sportston
- SL Viva

- Posts: 38
- Joined: Mon Apr 28, 2008 8:28 pm
- Location: Essex
electronic ignition
![]() by 1256man » Sun Aug 02, 2009 12:00 pm
by 1256man » Sun Aug 02, 2009 12:00 pm
hello hope you have put an inline fuse to the feed you shouldnt have any ignition problems now i had one in my last car for 4 years used every day and never touched it best thing id ever done
more space more cars
- 1256man
- GT Viva

- Posts: 215
- Joined: Thu Feb 05, 2009 9:59 pm
- Location: wolverhampton
electronic ignition
![]() by 1256man » Sun Aug 02, 2009 9:44 pm
by 1256man » Sun Aug 02, 2009 9:44 pm
basically the same as a standard viva if you do get any pinking which i didnt just take it back a bit until your happy just to let you know ive never had my valve seats done either and havent had any problems with that over the years with unleaded
more space more cars
- 1256man
- GT Viva
- Posts: 215
- Joined: Thu Feb 05, 2009 9:59 pm
- Location: wolverhampton
ok Thanks
![]() by sportston » Mon Aug 03, 2009 8:26 pm
by sportston » Mon Aug 03, 2009 8:26 pm
Ok thanks for that. I found that I couldn't get it to pink even when I tried. I got the engine locking on start up at one point due to advanced timing and still it didn't pink! I think I've got it fairly close but will check it with the strobe I borrowed from my old man.
thanks
Tom
thanks
Tom
- sportston
- SL Viva
- Posts: 38
- Joined: Mon Apr 28, 2008 8:28 pm
- Location: Essex
Timing settings
![]() by sportston » Fri Aug 07, 2009 11:12 pm
by sportston » Fri Aug 07, 2009 11:12 pm
With regard to Timing settings. I found a few advance figures for the new and old dizzys. They are as follows:-
Standard Delco Dizzy figures:-
Timing at idle is:-
1971-1978 figures for 1256cc 60hp engines are as follows
550-650rpm 9 deg. BTDC with vac adv. disconnected
1800rpm 13-17 deg. BTDC
4000rpm 18.5-22.5 deg. BTDC
5000rpm 23-27 deg. BTDC
vacuum adv. range 11-15 degrees
1971-1973 model 1256cc 53hp and all 1159cc engines are as follows
650-750rpm 4.5 deg. BTDC with vacuum advance disconnected
2000rpm 17.5-23 deg. BTDC
3200rpm 23.5-29 deg. BTDC
4000rpm 28-33 deg. BTDC
vacuum adv. range 11-15 deg.
Now for the Bosch Electronic Dizzy (Bosch part no. 0 237 003 039) 1100cc 1984-1989 Ford Fiesta:-
these are the settings for running on a Ford engine and will therefore need to be interpreted to fit the Viva engine.
Timing at idle (800 rpm) without vaccuum advance connected
2-6 deg. BTDC (depending on if you use unleaded)
1800rpm 6 deg. BTDC
3000rpm 7-13 deg. BTDC
6000rpm 16-23 deg. BTDC
vacuum range 8-14 deg.
The figures quoted above are correct according to Autodata.
It can clearly be seen that the Bosch dizzy has a much lower advance curve. With a little mathematics we should be able to work out the ideal timing setting at idle to enable us to get closer to the standard Viva settings at higher revs.
By my calculations (on paper only) the best idle timing setting for a 1256cc 60hp VIVA with the Bosch Electronic dizzy is:-
13-14 deg. BTDC with vac. adv disconnected
1256cc 53hp or 1159cc engines using the Bosch Electronic dizzy is:-
15 deg. BTDC with vac adv. disconnected
This should give the closest approximation of the correct advance curve.
However, if it pinks or makes idle emissions too high or lumpy idle, retard it a couple of degrees.
Mine is currently set at 11 Deg. BTDC and is running quite well. I plan on changing it to 13 to see what happens. I will keep you informed.
Should you try to do this to your car do so at your own risk. These are only my opinions to enable you to make your own choice.
- sportston
- SL Viva
- Posts: 38
- Joined: Mon Apr 28, 2008 8:28 pm
- Location: Essex
Re: How to fit Electronic ignition for £20
![]() by vauxhallbitz » Sun Oct 11, 2015 10:10 pm
by vauxhallbitz » Sun Oct 11, 2015 10:10 pm
I know that this is a very old thread but my car has this distributor fitted, can someone explain where the fuse should be fitted please?
1958 CA Bedford Dormobile (Porthole)
1960 Vauxhall Cresta PA
1975 Vauxhall Viva E Coupe
1960 Vauxhall Cresta PA
1975 Vauxhall Viva E Coupe
-

vauxhallbitz - Brabham Viva
- Posts: 597
- Joined: Sat Jul 17, 2010 6:48 pm
- Location: Rosyth, Fife , Scotland
8 posts
• Page 1 of 1
Who is online
Users browsing this forum: No registered users and 1 guest